Friday, October 31, 2014

A Recipe for Transformation

I first learned about matrices in a Business Math course in college and we painstakingly manipulated them by hand. It was not love at first sight.

But now it's 2014 and students are still multiplying matrices by hand and are never getting to see their transformational power. I say that literally because matrices are used to transform (rotate, reflect, translate) points in a 2 or 3-D plane. What would video games be without rotation matrices? That's right: Pong.

Unfortunately many textbooks neglect this graphical application which could be used to grab students' attention. Good for us Don "The Mathman" Cohen didn't neglect it. On the contrary, he and his very young students graphed a simple "dog" and multiplied its points one by one and graphed the result. Their work can be found in Cohen's characteristically clear, engaging and thought-provoking book "Changing Shapes with Matrices."


When I was working with a homeschooled Algebra 2 student on matrices, we used Python and its professional-strength numerical package Numpy to multiply and transform our matrices.

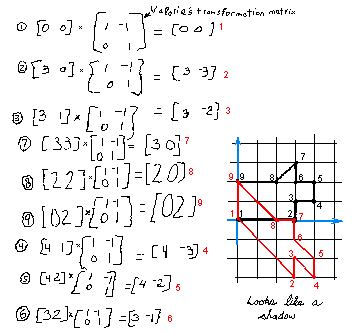
But if you're just using a 2x2 transformation matrix, it's not hard to write your own functions in Python to draw and multiply matrices. Since I don't have to do the multiplying by hand, I can use more points than Cohen did. I chose to transform a big F since it has no rotational or reflective symmetry and my last name starts with F. First draw it on graph paper (or Geogebra) to get the points:


Now type the points into an n x 2 matrix:


Ok, it's just a list. But we're using our imagination here. Now enter your favorite transformation matrix:


I wrote a function to connect the points in a matrix using the create_line function in Tkinter. But the important function (and one I think math teachers could benefit from assigning their students) is the one that multiplies two matrices together. a is the n x 2 matrix (it can have any number of rows) and b is the 2x2 transformation matrix:


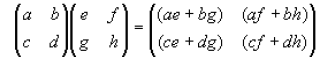
The above code isn't obvious. i needs to go up by 2 in order to skip from point to point, and j only has 2 values. But the a[i]*b[j] line is especially guaranteed to challenge math students! It'll make them think about how you multiply matrices, that's for sure:


Now just have the program multiply the F-matrix by the transformation matrix and graph the result:


This transformation matrix reflects every point across the line y = -x. Or is it a rotation, then a reflection? Change one number in your transformation matrix and you'll get a shear in the vertical direction:


Notice the new x-value is the old y-value and the new y-value is the negative of the sum of the old x- and y-values. I think this is exactly the kind of exploration math students should be getting so they can experience transformations and matrices first hand. I suspect this can all be done with a couple of keystrokes in IPython but doing some real programming to multiply matrices and graph the result is a great exercise!

Wednesday, October 8, 2014

Making the Mandelbrot

I've taught students to draw fractals like the Koch Snowflake in Logo and Python. The Sierpinski triangle and the Dragon Curve aren't hard to figure out, either. But the Mandelbrot Set always seemed like a different animal altogether. Sure, every math textbook has pictures of the famous pear-shaped fractal, but none teach you how to create it. Students and teachers get the feeling it must be something unapproachable, requiring years of training, but, predictably enough, a computer makes it easy.

It boils down to taking a point in the complex plane and iterating it using the formula:


c is a complex number of the form a + bi, where i is the square root of -1. Z is set to 0 initially, then you square it and add c. The result becomes the new Z. Square it and add c. Repeat a bunch of times. I think it's a great exercise for Precalculus students to write a program to do this.

As Paul Lutus explained visually, most points will get really large, and fly off out of the "control radius":


the ones that stay within the control radius are in the Mandelbrot Set.


So at first the set of points that don't fly off is big:


But iteration by iteration more and more points fly off ("diverge") and the blob starts to take the shape we know and love:


The challenge is how to take points (especially ones with a real part and an imaginary part) and put the coordinates into a function over and over. Many online examples require the use of numpy and other (very useful) Python add-ons, but I wanted to do it with only "stock" Python tools.

First I had to define a function to square the complex number a bunch of times. Every programming language has a way to handle lists, and Python's way is pretty easy. I made a 2-item list of numbers: the first item is the real part of the complex number and the second item is the imaginary part. Here's how to represent the complex number 2 + 3i:


Anybody familiar with multiplying polynomials can get their noggin around this:


The only thing separating this Precalculus exercise from an Algebra one is imaginary numbers, which I've mentioned before. When the imaginary part is squared it becomes real but negative. Now squaring complex numbers is easy:


This means the square of 2 + 3i is -5 + 12i and the square of 1 - i is -2i (the real part of the last list is zero).

Now it's just a matter of calling the squareZ function then adding c back in. This next function just tells you whether the squaring-adding is making the numbers get really big. If so, the original c is not in the Mandelbrot set.


If after all your iterating the point hasn't gotten more than 2 units away from the origin it's in the Mandelbrot set. So in the above blobs that point would be colored black. That was the tricky part. What's the best way to display the results? Will the easiest way look the best?

The original output in 1978 was text, and Paul Lutas' page contains the code needed to generate it. Here's my version, which didn't all fit on the screen at once:


It's exciting just to get that far! But I knew my students would probably want something more professional looking.

In his excellent book Python for Kids, Jason Briggs showed how to use Tkinter, the default graphics module in Python, to draw shapes and create a video game. So in my program the loops go through the rows and columns of the screen, iterating each point and coloring those in the Mandelbrot Set black. In an 800 x 800 screen that means it has 640,000 points to iterate!

To set up the screen, you have to import tkinter and put this code at the top of the program:


Finally, the main loop of the program looks like this:


The program starts at (xlow, ylow) and checks the point. If it stays within the control radius after 20 iterations it creates a one-pixel black square, otherwise it doesn't do anything and moves on to the next point. Here's how it looks:


The color pictures you see online are made by coloring the points that diverge every step. This requires some changes to the code (which I'll spare you) but it makes it look pretty. You'll recognize the colored shapes as the black blobs from above:


Python is a (relatively) easy way to explore ideas like iteration that would otherwise be impossible with just pencil and paper. Try it!